Installation
General computing requirements
There are a few computing requirements for the course that are absolutely necessary (beyond the few software packages we would like you to install, described below):
- You must have administrator access to your computer (i.e., you must be able to install things yourself without requesting IT approval).
- You must have at least 40 GB of free disk space on your computer (but we would recommend more, to be safe).
- If you are using Windows you must be using Windows 10 or 11; Windows 7 and 8 will not be sufficient for this course.
If you foresee any of these being a problem please reach out to one of the instructors for what steps you can take to ensure you are ready for the course.
Required software
To get the most out of our course, we ask you to install the following software:
- A command-line shell: Bash
- A version control system: Git
- A remote-capable text editor: VSCode
- Python 3 via Miniconda
- A virtualization system: Docker
- A GitHub account
- Discord
- A modern browser
Note Miniconda and VSCode are not strictly required, if you already have python and prefer to use pip, or if you already have a favorite text editor for programming, feel free to use that instead.
If you already have all of the above software tools/packages installed, or are confident you’ll be able to install them by the time the course starts, you can jump straight to checking your install. The rest of this page provides more detail on installation procedures for each of the above elements, with separate instructions for each of the three major operating systems (Windows, Mac OS, and Linux).
OS-specific installation instructions
Select the tab that corresponds to your operating system and follow the instructions therein.
Note: If the instructions below aren’t working and you have spent more than 15-20 minutes troubleshooting on your own, reach out on the #help-installation channel on the BHS Discord with the exact problems you’re having.
Prerequisites
- These installation instructions require Windows 10 version 21H1 or higher, or Windows 11 21H2 or higher. Please check with Windows Update to make sure your system is updated.
- You should enable Virtualization in your BIOS setting. Please click
ctrl+alt+delthen clickTask Manager, navigate to “Performance” tab and select CPU. Please make sure the Virtualization isEnabled.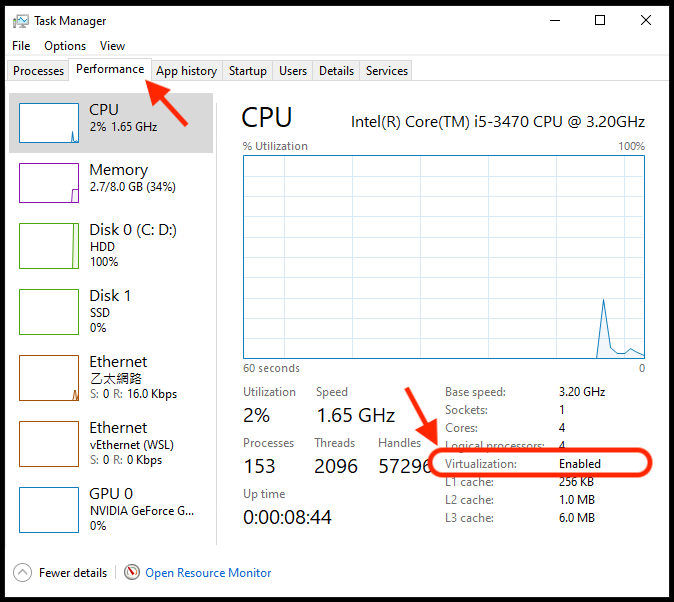 Note: If the Virtualization is “Disable”, you have to reboot your PC and get into BIOS setting to turn on the Virtualization function. Depending on your PC or motherboard manufacturer (ASUS, Acer, Dell, … etc), there are different ways to get into BIOS settings, so that we cannot provide common step-by-step instructions to help you turn on the Virtualization. If you have a problem on BIOS settings, please consult your friends or local TAs, or reach out on the
 #help-installationchannel on our Discord server.
Windows Subsystem for Linux (WSL)
Windows Subsystem for Linux (WSL) will install a Linux distribution (it is Ubuntu 22.04.1 LTS by default), then users can directly run Linux applications and Bash command-line tools on Windows. But, it should be noted that the Linux subsystem (i.e. Ubuntu) is an independent environment that has their own file structure and text command, which you will learn from another mandatory module. Some applications, such as VScode and Docker, can automatically integrate with WSL when you installed those on Windowns. But most applications, such as Python and probably your analysis softwares, should be installed under WSL. Please be cautious with these instructions in the future.
Search for
Windows Powershellin your applications; right click and selectRun as administrator. SelectYeson the prompt that appears asking if you want to allow the app to make changes to your device.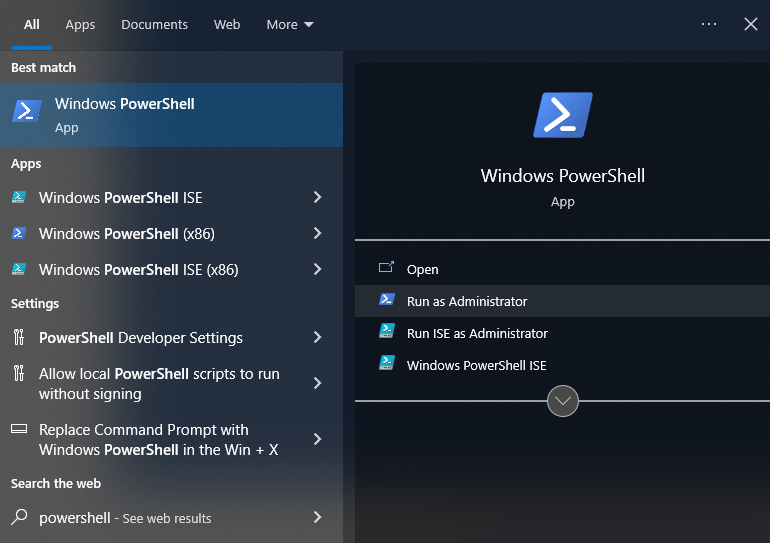
Type
wsl --installinto the Powershell and then pressEnter.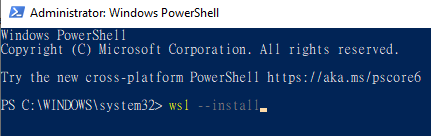
- You should see the messages about installing WSL, please wait and follow next step.
- If WSL help text prompted and no installing takes place, you might already have WSL installed. Check if you have
Ubuntuin your applications. Or, trywsl --install -d Ubuntuto install another Linux distribution.
A meesage will prompt to ask you to reboot the computer.

Once your computer has rebooted, a Ubuntu window will pop up. If no window popped up, search for and open Ubuntu from your applications. If you cannot find Ubuntu, try step 2 again.
It will show the message about installing Ubuntu, you will then be prompted to
Enter new UNIX username. You can use any combination of alphanumeric characters here for your username, but a good choice is<first_initial><last_name>(e.g.,jsmithfor John Smith). You will then be prompted to enter a new password. (Choose something easy to remember as you will find yourself using it frequently.)
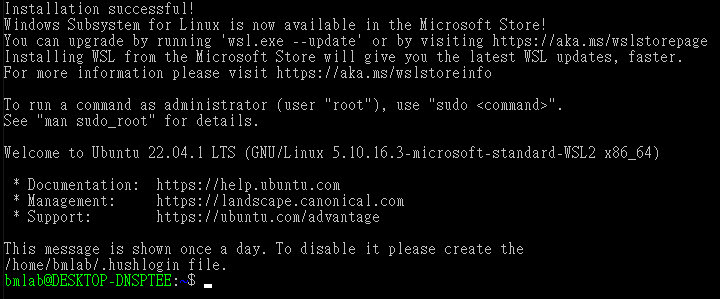
You will see the message to inform you that the installation is successful, and you can now close the window.
The final step is to check if we missed anything. Please search for powershell and run as administrator again. Then type
wsl -l -vand press enter. Please make sure you have Ubuntu in the list, and the version is 2.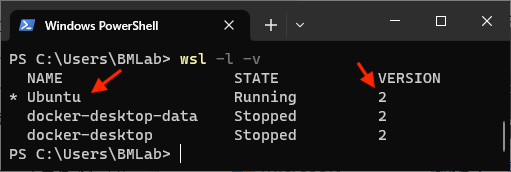
- If the version is not 2, please type
wsl --set-version Ubuntu 2to update the WSL to version 2. This is necessary for installing Docker on WSL.
- If the version is not 2, please type
Finally, in the same powershell window, type
wsl --update. Hopefully, there is no updates. Then, we can move on to the next step.
(The above step-by-step WSL instructions are distilled from here and here. If you have questions during the installation procedure those resources may have answers!)
Windows Terminal
Microsoft have Windows Terminal that will provide better functionality for command-line interface. This application is now built-in on Windows 11. We will demostrate how to open terminal for WSL (it is Ubuntu by default).
- Click here and download. Then, you can search and open Windows Terminal in your applications.
- By default, it will open a PowerShell for Windows system. For this course, we will use bash terminal on WSL. You can click the down arrow and select Ubuntu to open the terminal.
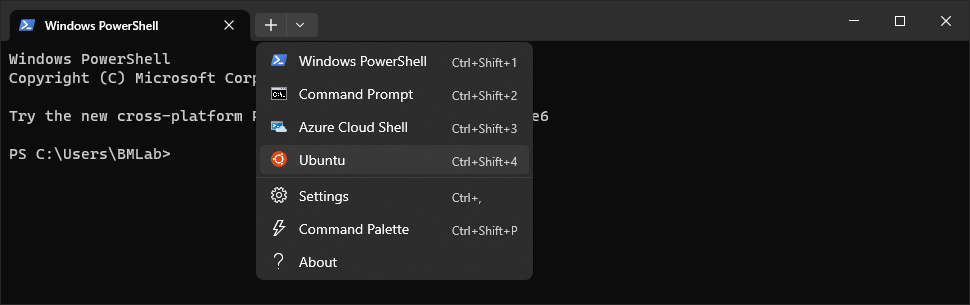
- If you would like to open Ubuntu terminal by default, you can change the default profile in Settings.
From this point on whenever the instructions specify to “open a terminal” please assume you are supposed to open the terminal for Ubuntu.
Bash shell
You already have it, now that you’ve installed the WSL!
Git
You already have it, now that you’ve installed the WSL!
VSCode
- Go to https://code.visualstudio.com/ and click the download button, then run the
.exefile on Windows. - Leave all the defaults during the installation with the following exception:
- Please make sure the box labelled “Register Code as an editor for supported file types” and “add to PATH” are selected.
- VScode is now installed on your Windows, and also integrated with your WSL. You can now open VScode either on Windows or WSL.
VSCode extensions
- Let’s try to open VScode on Windows system and install necessary extensions. Search and open VScode on your Windows application.
- Press
Ctrl+Shift+Pin the new window that opens and type “Extensions: Install extensions” into the search bar that appears at the top of the screen.- Select the appropriate entry from the dropdown menu that appears (there should be four entries; simply select the one that reads “Extensions: Install extensions”).
- A new panel should appear on the left-hand side of the screen with a search bar.
- Search for each of the following extensions and press
Installfor the first entry that appears. (The author listed for all of these extensions should be “Microsoft”.)- Python (n.b., you will need to reload VSCode after installing this)
- Docker
- WSL
- Search for each of the following extensions and press
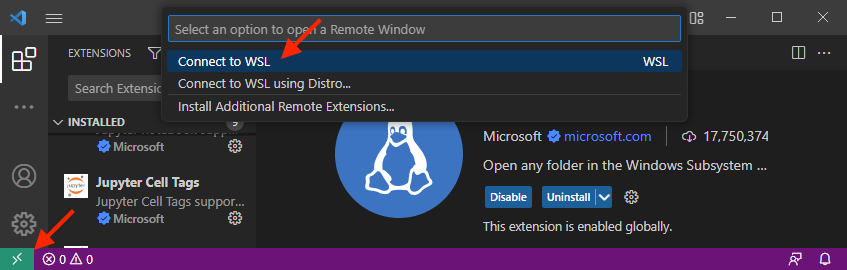
- Once the WSL extension is installed, you will see a new icon appear at the bottom left corner. You can now access to WSL by this icon. Click on it and select “connect to WSL”. The whole VScode will be refreshed and then connected to WSL.
- Press
Ctrl+Shift+Pin the new window that opens and type “Extensions: Install extensions” into the search bar that appears at the top of the screen. You will find that the three extensions are not installed on WSL. Please also install the three extensions, and be cautious that Windows and WSL are isolated systems that the most of extensions, softwares or packages should be installed separately. - Close the VScode. Let’s try another way to open VScode on WSL. Open the terminal for WSL (it is Ubuntu by default), then type
code .into the terminal and pressEnter. Check the icon botom left, you will find that VScode is now on WSL.- You can get back to Windows by clicking the icon, and selecting “Close remote connection”.
Python
Open a new terminal for WSL and type the following lines (separately) into the terminal, pressing
Enterafter each one:wget https://repo.anaconda.com/miniconda/Miniconda3-latest-Linux-x86_64.sh bash Miniconda3-latest-Linux-x86_64.shA license agreement will be displayed and the bottom of the terminal will read
--More--. PressEnteror the space bar until you are prompted with “Do you accept the license terms? [yes|no].” Typeyesand then pressEnterThe installation script will inform you that it is going to install into a default directory (e.g.,
/home/$USER/miniconda3). Leave this default and pressEnter.When you are asked “Do you wish the installer to initialize Miniconda3 by running conda init? [yes|no],” type
yesand pressEnter. Exit the terminal once the installation has finished.Re-open the Ubuntu application. Type
which pythoninto the terminal and it should return a path (e.g.,/home/$USER/miniconda3/bin/python).- If you do not see a path like this then please try typing
conda init, closing your terminal, and repeating this step. If your issue is still not resolved skip the following step and contact an instructor on the #help-installation channel on the BHS Discord.
- If you do not see a path like this then please try typing
Type the following to remove the installation script that was downloaded:
rm ./Miniconda3-latest-Linux-x86_64.sh
Python packages
Open a terminal and type the following commands:
conda config --append channels conda-forge
 conda config --set channel_priority strict
 conda install -y flake8 ipython jupyter jupyterlab matplotlib nibabel nilearn numpy pandas scipy seaborn
Docker
- Download and run the latest Docker Desktop installer. When you see the configuration, please turn on “Use WSL 2 instead of Hyper-V” (this option is not available on some Windows versions). Then the installer will ask you to log out or reboot.
- After login, search and open Docker Desktop, it will take a while to initialize the Docker. The initialization will be done when a tutorial guide shows up. You can skip the tutorial and move on to the next step.
- Docker Desktop will automatically integrate into WSL. We should test if docker is sucessfully installed on WSL. Open the terminal for WSL (i.e. Ubuntu), once you see a
$prompt typedocker run hello-world. A brief introductory message should be printed to the screen, and you have sucessfully installed Docker on Windows and WSL.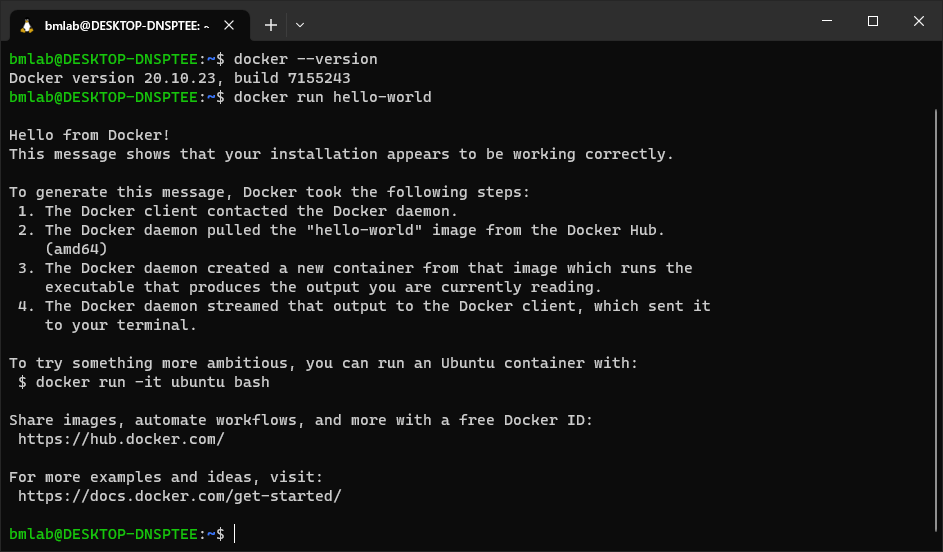
Note: If you restart your computer (or somehow otherwise shut down the Docker VM) you will need to re-open the “Docker Desktop” application before your docker commands will work again!
If you are having problems running docker commands in the terminal, try re-opening the “Docker Desktop” application.
(The above step-by-step instructions are distilled from here and here. If you have questions during the installation procedure please check those links for potential answers!)
Bash shell
You already have it!
Depending on which version of Mac OS you’re running you may need to type bash inside the terminal to access it.
To check whether this is necessary, follow these steps:
- Open a terminal and type
echo $SHELL.- If it reads
/bin/bashthen you are all set! (The Macs now have/bin/zshas default, it is compatible with bash, so you are set too!)
- If it reads
Note: If you are using Mac Catalina (10.15.X) then it is possible your default shell is NOT CORRECT.
To set the default to bash, type chsh -s /bin/bash in the terminal, enter your password when prompted, and then close + re-open the terminal.
Git
You may already have it!
Try opening a terminal and typing git --version.
If you do not see something like “git version X.XX.X” printed out, then follow these steps:
- Follow this link to automatically download an installer.
- Double click the downloaded file (
git-2.33.0-intel-universal-mavericks.dmg) and then double click thegit-2.33.0-intel-universal-mavericks.pkgicon inside the dmg that is opened. - Follow the on-screen instructions to install the package.
VSCode
- Go to https://code.visualstudio.com/ and click the download button.
- Unzip the downloaded file (e.g.,
VSCode-darwin-stable.zip) and moving the resultingVisual Studio Codefile to your Applications directory.
VSCode extensions
- Open the Visual Studio Code application
- Type
Cmd+Shift+Pand then enter “Shell command: Install ‘code’ command in PATH” into the search bar that appears at the top of the screen.- Select the highlighted entry.
- A notification box should appear in the bottom-right corner indicating that the command was installed successfully.
- Type
Cmd+Shift+Pagain and then enter “Extensions: Install extensions” into the search bar.- Select the appropriate entry from the dropdown menu that appears (there should be four entries; simply select the one that reads “Extensions: Install extensions”).
- A new panel should appear on the left-hand side of the screen with a search bar.
- Search for each of the following extensions and press
Installfor the first entry that appears. (The author listed for all of these extensions should be “Microsoft”.)- Python (n.b., you will need to reload VSCode after installing this)
- Docker
- Search for each of the following extensions and press
Python
Open a new terminal and type the following lines (separately) into the terminal, pressing
Enterafter each one:On X86 MacOs machine :
curl -O https://repo.anaconda.com/miniconda/Miniconda3-latest-MacOSX-x86_64.sh
 bash Miniconda3-latest-MacOSX-x86_64.sh
On ARM MacOs machine :
curl -O https://repo.anaconda.com/miniconda/Miniconda3-latest-MacOSX-arm64.sh
 bash Miniconda3-latest-MacOSX-arm64.sh
A license agreement will be displayed and the bottom of the terminal will read
--More--. PressEnteror the space bar until you are prompted with “Do you accept the license terms? [yes|no].” Typeyesand then pressEnterThe installation script will inform you that it is going to install into a default directory (e.g.,
/home/$USER/miniconda3). Leave this default and pressEnter.When you are asked “Do you wish the installer to initialize Miniconda3 by running conda init? [yes|no],” type
yesand pressEnter. Exit the terminal once the installation has finished.Re-open a terminal. Type
which pythoninto the terminal and it should return a path (e.g.,/home/$USER/miniconda3/bin/python).- If you do not see a path like this then please try typing
conda init, closing your terminal, and repeating this step. If your issue is still not resolved skip the following step and contact an instructor on the #help-installation channel of the BHS Slack.
- If you do not see a path like this then please try typing
Type the following to remove the installation script that was downloaded:
On X86 MacOs machine :
rm ./Miniconda3-latest-MacOSX-x86_64.shOn ARM MacOs machine :
rm ./Miniconda3-latest-MacOSX-arm64.sh
Python packages
Open a terminal and type the following commands:
conda config --append channels conda-forge
 conda config --set channel_priority strict
 conda install -y flake8 ipython jupyter jupyterlab matplotlib nibabel nilearn numpy pandas scipy seaborn
Docker
- Go to https://www.docker.com/products/docker-desktop/ and select the right version for your computer.
- Open the “Docker.dmg” file that is downloaded and drag and drop the icon to the Applications folder
- Open the Docker application and enter your password. An icon will appear in the status bar in the top-left of the screen. Wait until it reads “Docker Desktop is now up and running!”
- Open a new terminal and type
docker run hello-world. A brief introductory message should be printed to the screen.
(The above step-by-step Docker instructions are distilled from here. If you have questions during the installation procedure please check that link for potential answers!)
Bash shell
You already have it!
Depending on which version of Linux you’re running you may need to type bash inside the terminal to access it.
To check whether this is necessary, follow these steps:
- Open a terminal and type
echo $SHELL.- If it reads
/bin/bashthen you are all set! - If not, whenever the instructions read “open a terminal,” please assume you are to open a terminal, type
bash, and then proceed with the instructions as specified.
- If it reads
Git
You may already have it; try typing sudo apt-get install git (Ubuntu, Debian) or sudo yum install git (Fedora, CentOS) inside the terminal.
If you are prompted to install it, follow the instructions on-screen to do so.
VSCode
- Go to https://code.visualstudio.com/ and click the download button for either the .deb (Ubuntu, Debian) or the .rpm (Fedora, CentOS) file.
- Double-click the downloaded file to install VSCode. (You may be prompted to type your administrator password during the install).
VSCode extensions
- Open the Visual Studio Code application.
- Press
Ctrl+Shift+Pin the new window that opens and type “Extensions: Install extensions” into the search bar that appears at the top of the screen.- Select the appropriate entry from the dropdown menu that appears (there should be four entries; simply select the one that reads “Extensions: Install extensions”).
- A new panel should appear on the left-hand side of the screen with a search bar.
Search for each of the following extensions and press
Installfor the first entry that appears. (The author listed for all of these extensions should be “Microsoft”.)- Python (n.b., you will need to reload VSCode after installing this)
- Docker
Python
Open a new terminal and type the following lines (separately) into the terminal, pressing
Enterafter each one:wget https://repo.anaconda.com/miniconda/Miniconda3-latest-Linux-x86_64.sh bash Miniconda3-latest-Linux-x86_64.shA license agreement will be displayed and the bottom of the terminal will read
--More--. PressEnteror the space bar until you are prompted with “Do you accept the license terms? [yes|no].” Typeyesand then pressEnterThe installation script will inform you that it is going to install into a default directory (e.g.,
/home/$USER/miniconda3). Leave this default and pressEnter.When you are asked “Do you wish the installer to initialize Miniconda3 by running conda init? [yes|no],” type
yesand pressEnter. Exit the terminal once the installation has finished.Re-open a new terminal. Type
which pythoninto the terminal and it should return a path (e.g.,/home/$USER/miniconda3/bin/python).- If you do not see a path like this then please try typing
conda init, closing your terminal, and repeating this step. If your issue is still not resolved skip the following step and contact an instructor on the#help-installationchannel of the BHS Discord.
- If you do not see a path like this then please try typing
Type the following to remove the installation script that was downloaded:
rm ./Miniconda3-latest-Linux-x86_64.sh
Python packages
Open a terminal and type the following commands:
conda config --append channels conda-forge
 conda config --set channel_priority strict
 conda install -y flake8 ipython jupyter jupyterlab matplotlib nibabel nilearn numpy pandas scipy seaborn
Docker
- You will be following different instructions depending on your distro (Ubuntu, Debian, Fedora, CentOS). Make sure to follow the “Install using the repository” method!
- Once you’ve installed Docker make sure to follow the post-install instructions as well. You only need to do the “Manage Docker as a non-root user” and “Configure Docker to start on boot” steps.
- Open a new terminal and type
docker run hello-world. A brief introductory message should be printed to the screen.
GitHub account
Go to https://github.com/join/ and follow the on-screen instructions to create an account. It is a good idea to associate this with your university e-mail (if you have one) as this will entitle you to sign up for the GitHub Student Developer Pack which comes with some nice free bonuses.
Discord
Go to https://discord.com/download and download and install Discord. You will be invited to the BrainHack School Discord server via the e-mail with which you registered for the course. If you have not received the invitation, please reach out to one of the instructors.
Modern web browser
Install Firefox or Chrome. (Safari will also work.) Microsoft Edge is not modern, despite what Microsoft might try and otherwise tell you.
Checking your install
Now that you’ve installed everything it’s time to check that everything works as expected! Type the following into your terminal:
bash <( curl -s https://raw.githubusercontent.com/brainhackorg/school/master/content/en/modules/installation/nds_check_install.sh )
If you installed everything correctly you should see a message informing you as such. If any problems were detected you should receive some brief instructions on what is wrong with potential suggestions on how to remedy it. If you followed these instructions step-by-step and cannot resolve the issue please post in the relevant module channel on the school Discord server. If you do not have access to the server and would like to join, please send us an email at school [dot] brainhack [at] gmail [dot] com..